I'll be sure to post when I'm done sewing up a sample!
Wednesday, October 19, 2016
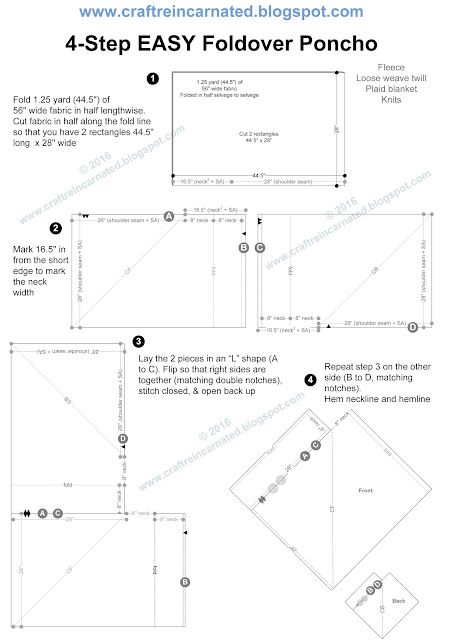
Easy Foldover Poncho
Full disclosure... I have NOT sewn this up yet. But I have laid out my measurements, drafted the blueprint and I'm ready to use up some scraps of fleece in my stash. I may have to piece some things together to get a full 1 1/4" yard of fabric.
Friday, June 10, 2016
Southwest T-shirt - a refashion story
This was a fun & easy little project. I normally like to refashion t-shirts, but this time I admit I bought it brand new. Michael's had Gilden t-shirts on sale for $2 - so I couldn't refuse. I bought a nice brand new 2XL shirt & refashioned it to an old dusty tie dye shirt :-)
- Trim down the neckband - cut just above the stitching line to hold it's shape
- Cut off the sleeves. I cut mine way back and I sewed my side seams in some, but you can just cut off the sleeves
- Tie dye your shirt. I did an accordion fold diagonally & tied it off with rubber bands, then I submerged it in a jar of Palomino Gold proactive dye from Dharma Trading - I let it sit in the jar for 24-hours. Wash & dry the t-shirt
- Using a grid ruler & rolling cutter, I cut 3/8" wide fringe all around the bottom (hence the 2XL shirt - I wanted the extra length)
- Knot the fringe. Take 2 stands & cross over 2 strands & knot them with the following 2 strands. Continue in the same direction all the way around the shirt.
Style it with your outfit & wear it!
Tuesday, January 12, 2016
No-Sew Easy Shawl
Another iteration of my Turquoise Shawl - again for about $8 - but this time it can be done with NO SEWING! Whoo hoo! I still did some sewing on mine - a hem - but totally not necessary. Here's what I did.
NOTE: You're going to use 3 yards of it, but most fabric is not on grain when you purchase it, so I always get 1/4" more for grain adjustment
OPTIONAL: If you would like to hem the selvedge, cut away about 3/4" from the fringe area so you can roll the selvedge over & hem it. I didn't care for the selvage edge, so I hemmed mine.
- See more at: http://craftreincarnated.blogspot.com/2015/11/turquoise-shawl-for-8.html#sthash.yznycUMU.dpuf

Step 1: Buy Fabric
Purchase 3.25 yards of your favorite fleece (60" wide) - I found mine at Hancock Fabrics for $2.75/yd + 25% off coupon.NOTE: You're going to use 3 yards of it, but most fabric is not on grain when you purchase it, so I always get 1/4" more for grain adjustment
Step 2: Lay out Fabric
Lay your fabric out cut edge to cut edge. This gives you a corner to work from that is 1 side fold and 1 side selvedge that is at least 54" long from the corner.Step 3: Measure & Mark
Measure from the corner (the corner of fold and selvedge edge) out 54" and begin marking ticks in a semi circle using tailor's chalk or washable marker/pen (see image).Step 4: Measure & Mark
Measure from the corner (the corner of fold and selvedge edge) out 30" and begin marking ticks in a semi circle using tailor's chalk or washable marker/pen (see image).Step 5: Fringe
Start cutting 1/2" to 3/4" thick fringe pieces from the 54" line to the 30" line - through both layers of fabric. Since you are working on a curved edge, about every 6-7 pieces you will be cutting away excess fabric (see the triangular gaps shown in the image) to keep the fringe following the curved edge.OPTIONAL: If you would like to hem the selvedge, cut away about 3/4" from the fringe area so you can roll the selvedge over & hem it. I didn't care for the selvage edge, so I hemmed mine.
Step 6: Knotting Fringe
Now it's time to tie the fringe. You take 3 pieces (1,2,3) on one edge and place them over the next 3 pieces (4, 5, 6), and tie them to the following 3 pieces (7, 8, 9). Next you take your pieces you crossed over (4, 5, 6) and place them over pieces 7, 8, 9, and tie them to pieces 10, 11, 12. Continue this pattern all the way around.- See more at: http://craftreincarnated.blogspot.com/2015/11/turquoise-shawl-for-8.html#sthash.yznycUMU.dpuf
This one is warmer than my knit one I did in turquoise - which works great South Texas winter :-)

Labels:
cowgirl,
easy gifts,
easy pattern,
fleece,
fringe,
knit fabrics,
no sew,
sewing,
shawl
Subscribe to:
Posts (Atom)


