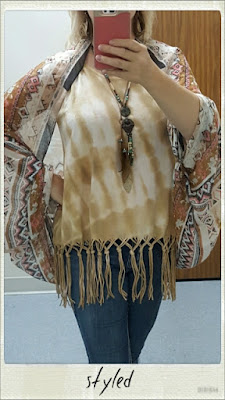
I saw this luscious turquoise goatskin fringe shawl all over Pinterest last fall & just fell in love with it. First off - it took forever to track this sucker down; Secondly - when I did finally track it down it was a whooping $650! Well, I couldn't swing that on a shawl/poncho type item, no matter how luscious it is. So I set off to make my own.
 |
| No baby goats were harmed in the making of my shawl |
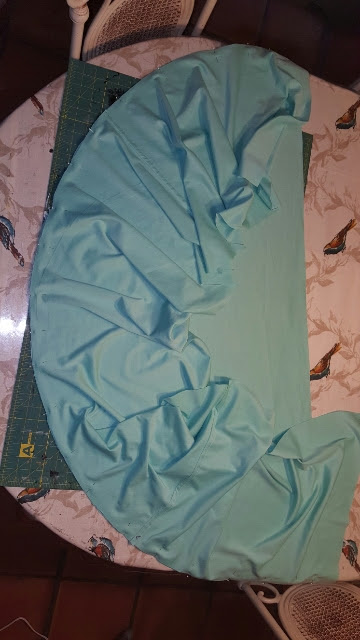
I found this pretty poly cotton blend, turquoise, 2-way knit fabric for $4 a yard (and I think I may have had a coupon too). I bought 2 yards and stashed it in my craft room until there was time to work on it. Finally about 6 months later - I have my own shawl now. Here's what I did:
Step 1 is to lay out the fabric so that I could mark and cut a 1/2 circle. with my fabric folded longways and my selvages matching up - I trimmed up my short edge to a nice 90 degree straight line. The width of my fabric was 60" (30" folded in half)
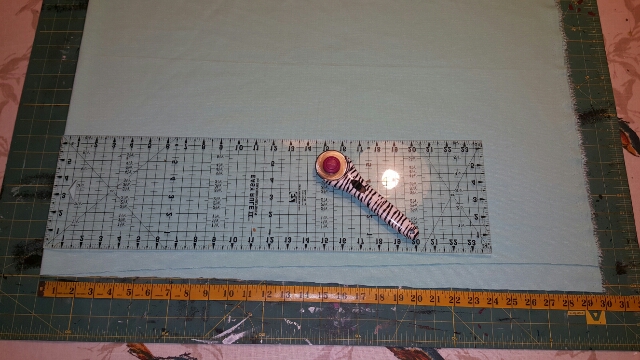 |
| 1. Truing up my cut edge |
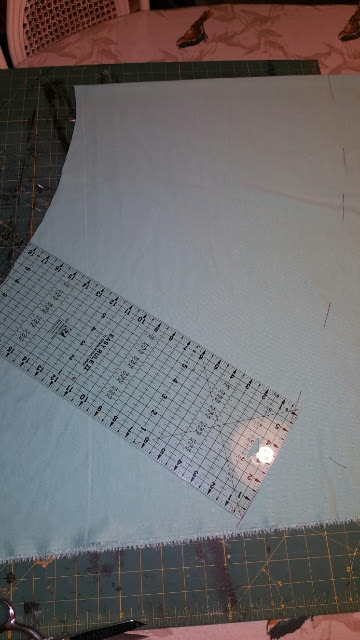
To mark my half-circle, I began at my straight trimmed edge & measured out 26" from short edge to folded edge. This gives me a 1/2 circle 26" long by 52" wide.
 |
| 2. Measure and mark a 26" semi circle from the folded edge |
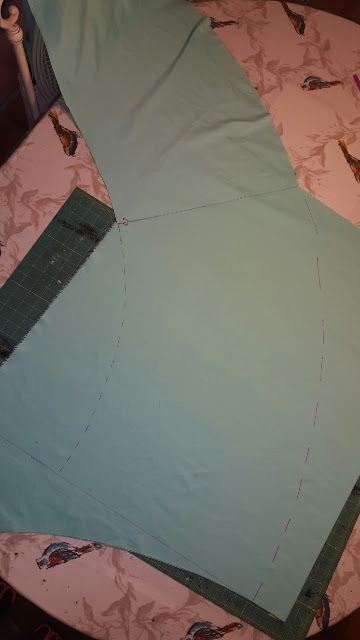
Cut out the 1/2 circle.
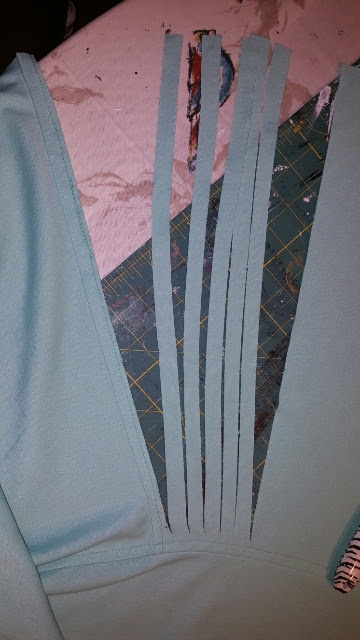
Now the tricky part. I knew I wanted my fringe to follow the curve, so I cut my fringe pieces in a curve. The easier way to do this would be to cut the fringe length pieces straight across - but I honestly didn't know how it would turn out sewn onto the shawl curve, so I did mine the hard way.
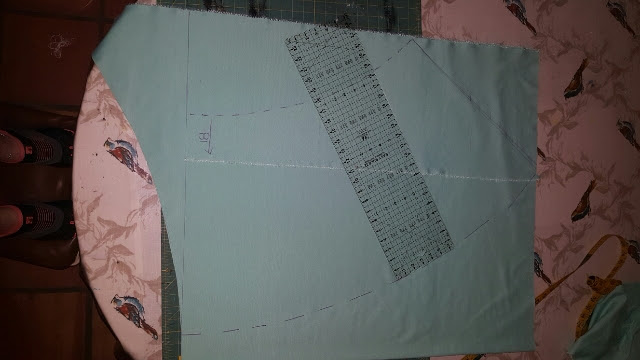
Using the precut circle curve as my guide - I measured 18" down from the cut curve line and marked it to cut.
 |
| 3. Using the pre-cut curve as my guide. My fringe border piece measures 18" long. Stop where you can have a full 18" width of fabric & a right angle to your bottom mark. |
Then I opened my fabric & continued to mark. Now, the cut piece won't go all the way around the edge of the shawl (it's too short), so you need to cut a little more.
 |
| 4. Using my fringe border piece as a template to trace and cut out a bit more fringe border |
I laid out my "fringe" curve on the remaining fabric & used that as a template to trace a bit more curve (image above).
 |
| 5. Cutting a bit more fringe border to make sure it will go all the way around the edge of my shawl. |
After I finished cutting out all my 18" fringe border pieces, it's time to sew. First, hem the straight edge of your half-circle. Second, connect your fringe border pieces at the straight lines. Third, sew your fringe border section to the half-circle section.
|
|
6. Pinning the fringe border to the shawl edge to prepare to sew.
I wanted a top-stitched, flat-feld seam look, so I trimmed one side of my seam allowance, then pressed both seam allowances to the trimmed side. Last, I top stitched it down so. (knit fabric does not fray, so no need to finish the seam allowance any further)
|
 |
| 7. Pressing my seams to the inside & then top-stitching them |
Here's what it looks like with the fringe border sewn in & all the seams topstitched (Pay no mind to the water marks or cat in the picture). The water marks are a seam where I was removing my washable marker marks. There are 3 fringe border sections, the large piece in the middle (made from using the semi circle cut line as a guide - and the two ends - where I folded out my cut border & used it to mark up the rest of my fabric (pictures 3-5)
 |
| 8. The border sewn to the shawl & top stitched down |
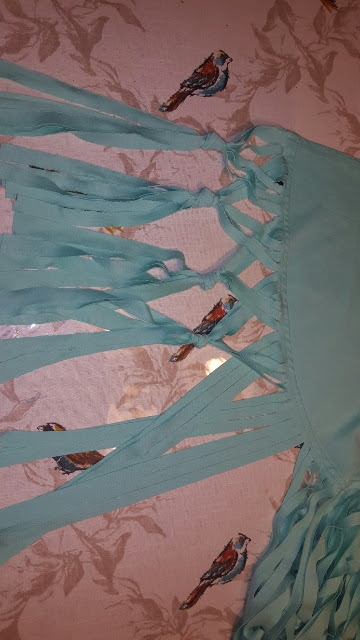
Now it's time to cut the fringe. My fringe is .5" wide at the top and .75" wide at the bottom. Because I'm cutting on a curve, your fringe pieces are more like wedges & not straight fringe. Also, there were a few areas where I removed some excess fabric triangles (probably about 4 or 5 spots) because some of the fringe pieces just didn't look nice. I started working from the fringe border seam area out - that way I could make sure the seamed piece became it's own fringe piece.
 |
| 9. Cutting out the fringe pieces |
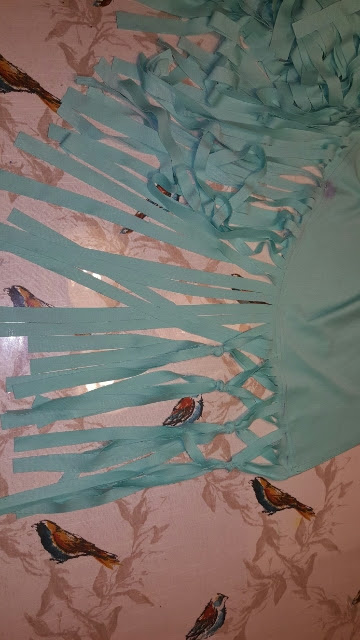
Now it's time to tie the fringe. You take 3 pieces (1,2,3) on one edge and place them over the next 3 pieces (4, 5, 6), and tie them to the following 3 pieces (7, 8, 9). Next you take your pieces you crossed over (4, 5, 6) and place them over pieces 7, 8, 9, and tie them to pieces 10, 11, 12. Continue this pattern all the way around.
 |
| 10. 3 strand fringe pieces tied together. |
 |
| 11. I also tried it using just 2 piece strands since my fringe is fat... didn't like it. I untied them & used the 3 pieces method. |
Voila - a $8 fringe shawl!
Next time I might try the easier method of just cutting one big 1/2 circle & fringing the bottom - OR - cutting a straight fringe border & sewing that to a semi circle to see what I get.
Followup...
I have a post where I made one of these out of fleece & did no sewing at all - worked like a charm!
http://craftreincarnated.blogspot.com/2016/01/no-sew-easy-shawl.html?m=1


